OBJECTIVES & QUESTIONS
Overview
How is a central venous catheter or ‘central line’ defined?
The ASA defines central venous access as:
“placement of a catheter such that the catheter is inserted into a venous great vessel. The venous great vessels include the superior vena cava, inferior vena cava, brachiocephalic veins, internal jugular veins, subclavian veins, iliac veins, and common femoral veins.”
What are the indications for central venous access?
- Administration of drugs which are irritant given in to smaller vein:
- Vasopressors
- Potassium
- Cytotoxic drugs
- TPN
- Haemodynamic monitoring:
- Central venous pressure (CVP)
- Venous saturations
- Right heart catheterisation
- Organ support:
- Haemodialysis
- ECMO
- Interventions:
- Transvenous cardiac pacing
- IVC filter placement
- Venous stenting
- Difficult peripheral access
What are the contraindications to central venous access?
- Patient refusal
- Distorted anatomy
- Skin infection over insertion
- Anatomical Distortion
- Vessel thrombosis or stenosis
- Pneumothorax or haemothorax on contralateral side
- Uncooperative Patient
- Bleeding diathesis
What are the complications that can arise from central line insertion?
- Pleural puncture:
- Pneumothorax
- Haemothorax
- Intrapleural placement of the line
- Carotid artery puncture
- Intimal dissection
- Emboli
- Flow obstruction and cerebral infarction
- Local haematoma of neck
- Nerve injury:
- Vagus Nerve
- Recurrent Laryngeal Nerve
- Sympathetic tract - Horner's syndrome
- Phrenic nerve
- Thyroid puncture
- Thoracic duct puncture (low, left-sided approach)
- Arrhythmias following line insertion
- Air embolism
- Guidewire embolisation
- Infection:
- Localised
- Bloodstream
- Vessel stenosis
- Thrombosis
- Cardiac tamponade following erosion of vessel wall by line tip
- Subclavian vein cannulation
- Microshock
Catheter Selection & Insertion
What types of central venous access can be used?
- One - six lumens
- Insertion to subclavian, IJV or femoral veins
- Some can be used for extra‐corporeal treatments
- Short‐term CVC for drug administration, haemodynamic monitoring or renal replacement therapy
- Up to 7–10 days
- Routine replacement not required
- One - three lumens
- Insertion to subclavian, IJV or femoral veins
- Tunnelled to exit site where a dacron cuff anchors device
- Frequent long‐term access.
- Long term renal replacement therapy
- Months/years
- Lower infection than non‐tunnelled catheters
- One - two lumens
- Insertion to subclavian, IJV, femoral or upper arm veins
- Tunnelled to port
- Uses needle access
- Frequent long‐term access
- Months/years
- Lower infection than tunnelled catheters
- Least lifestyle disruption Complex to insert/remove
- One - three lumens
- Insertion to basilic, cephalic and brachial veins
- Simpler and safer to insert than other lines
- Frequent administration of drugs such as antibiotics or chemotherapy
- 1–6 months, or longer
- Suitable for short‐term use
How do you choose which CVC to insert for a patient?
- Choice of CVC depends on a number of factors:
- Patient diagnosis
- Intended treatment
- Insertion site
- The general principles are to select:
- Select the smallest size catheter appropriate for the clinical situation
- The lowest number of lumens needed but ensuring enough for planned usage to avoid risks of additional catheter placement
- A dedicated lumen for TPN if required
- Fixed length catheters depending upon insertion site:
- Right internal Jugular Vein
- Left Internal Jugular Vein
- Right Axillary / Subclavian Vein
- Femoral Vein
- Left Axillary / Subclavian Vein
Insertion Site
Which sites can be used for CVC insertion and what are the advantages / disadvantages associated with each site?
- It is a large, easily compressible superficial vein
- It has relatively consistent surface landmarks
- It is easy to visualise with ultrasound
- It has a relatively straight course on the right side into the superior vena cava
- Risk of carotid artery damage
- Risk of pneumothorax
- Can be uncomfortable for the patient
- It is a large vein with surrounding tissue preventing collapse
- There are fixed bony landmarks
- It is a comfortable catheter position for the patient
- It allows for an easier secure fixation of the catheter
- It is a clean site with reduced risk of infection, potentially allowing longer duration of use
- Higher incidence of complications particularly pneumothorax
- Difficult to compress in the event of arterial puncture
- Landmarks are less readily identifiable, particularly in obese patients
- More difficult to visualise with ultrasound due to clavicle - more lateral approach required
- Curved route makes misplacement of catheter more likely
- Can lead to subclavian stenosis precluding the use of the extremity for renal access
- It is a large superficial vein
- It provides a straight course into the inferior vena cava
- The procedure avoids risk to thoracic structures
- Can be inserted without the patient lying flat
- Higher risk of infection
- Uncomfortable for the mobile patient
- Increased risk of thrombosis
- Haemorrhage can cause false aneurysm, and can track into the retroperitoneum (potentially causing fatal concealed bleed)
- Contraindicated if IVC filter present
What is the evidence supporting the optimal site for CVC insertion?
- Catheters inserted in internal jugular (IJ), subclavian and femoral sites in a 1:1:1 ratio
- All catheters were inserted by experienced operators (performed at least 50) using the Seldinger technique
- Placed using ultrasound guidance or landmark technique
- 3471n central venous catheters inserted in 3027 ICU patients across five hospitals in France
- Subclavian vein catheters associated with a lower combined risk of thrombosis and bloodstream infection compared to IJ or femoral catheters (1.5 vs 3.6 vs 4.6 per 1000 catheter-days, p= 0.02)
- Subclavian vein catheters associated with an increased risk of mechanical complications (2.1% vs 1.4% vs 0.7%, p=0.047)
How should you determine which site to use when inserting a CVC?
Based on several factors:
- Practitioner judgement
- Practitioners experience and site
- Clinical indication:
- Renal replacement therapy:
- Right IJV and femoral preferred due to straight course
- Patient factors:
- Unable to lie flat: Femoral may be easier to insert
- One-sided lung pathology: Insert upper body lines on the side of pathology to limit the potential effects of mechanical complications
- Anatomical variability
Catheter Tip Position
Where should the tip of a CVC lie?
- It is usually recommended that the CVC tip should lie in the SVC above the pericardial reflection:
- Close to the RV for dilution of infused substances
- Avoids catastrophic pericardial bleeding and tamponade if tip perforates the vessel wall
- Catheter tip should lie in the long axis of the SVC without acute abutment to the vein wall:
- Angle of the CVC tip to vessel wall of greater than 40° is more likely to lead to vessel wall perforation
- May necessitate L sided lines being placed below pericardial reflection to ensure they run parallel with the SVC
Which methods can be used to assess the position of the catheter tip?
- Chest x-ray
- Fluoroscopy
- Transthoracic echocardiography
- Continuous electrocardiography
Where is the appropriate position for a CVC tip on CXR?
- The most commonly used x-ray landmark is the carina:
- Origin of the Superior vena cava 1-2cm above
- Pericardial reflection lies 1-2cm below
- Tip should lie within the boundaries
- Cavo-atrial junction usually lies two vertebral bodies below the carina:
- Above this may be an acceptable position for L sided lines to ensure they lie parallel or haemodialysis catheters to optimise flow

What formulas can be used to calculate the length of the catheter to insert?
- A number of issues exist with these formulas:
- Technique of insertion varies (e.g. site of puncture)
- Anatomy of individual patients vary
- Therefore confirmation of the tip is still required
Use of Ultrasound
What are the advantages and disadvantage of using ultrasound guidance for CVC placement?
- Greater success rate
- Clear demonstration of a patent vein
- Clear demonstration of hypovolaemia (collapsing veins on inspiration)
- Reduced risk of bloodstream infections
- Visualisation of the collateral structures to be avoided
- Recognition of local pathology
- Real-time needle guidance during puncture
- Increased chance of 1st pass puncture
- Visualisation of needle/wire/catheter in a vein may confirm placement of the catheter
- Recognition of complications
- Easier cannulation in the head-up position (e.g. brain injury)
- Requires training and experience - need to become accustomed to manipulating the probe while, at the same time, directing the needle
- Not possible to visualise the final position of the catheter tip
- Damage to collateral structures can still occur where operators cannot consistently visualise the needle tip
Coagulopathy
Can CVCs be placed in patients with coagulopathy?
- The risks of bleeding are dependent upon multiple factors
- In the setting of coagulopathy:
- Experienced operators should insert the CVC using ultrasound guidance
- A site with easily compressible vessels – Femoral veins may pose a lower risk in this situation
- AAGBI guidance suggests
- Consider correcting coagulopathy if:
- Platelet count < 50 × 109/l
- APTT >1.3
- INR >1.8
- Understand different thresholds may apply for different patients
- Suggest risks of prophylactic correction with blood products to prevent local bleeding may outweigh benefits and can be considered after if problems occur rather than pre-procedure
- Consider correcting coagulopathy if:
- BSH guidance has updated guidance suggesting CVCs can be safely inserted with a platelet count 20 × 109/l
Internal Jugular Vein
What is the course of the internal jugular vein?
- Forms from the sigmoid and petrosal sinuses as a continuation of the jugular bulb
- Exits the skull via the jugular foramen
- Descends in the carotid sheath with the internal carotid artery and Vagus nerve:
- Initially starts posteriorly to the carotid artery
- Lower in the neck becomes lateral and then anterolateral to the carotid artery
- Terminates at the sternoclavicular joint where it joins the subclavian vein to form the brachiocephalic vein

What are the tributaries of the internal jugular vein?
Receives tributaries from the face and neck:
- Inferior petrosal sinus
- Pharyngeal veins
- Facial veins
- Lingual veins
- Superior thyroid
- Middle thyroid veins

Memory Tip
Can be remembered using the mnemonic:
I STUMBLE
Which structures are in close proximity to the internal jugular vein?
- Lies deep to the sternocleidomastoid muscles
- Lies within the carotid sheath:
- Lies lateral to the carotid artery
- Vagus nerve runs within the sheath just posterior to the 2 vessel

- Structures nearby include:
- Skin and subcutaneous tissue
- Platysmas Muscle
- Sternocleidomastoid muscle
- Carotid artery (superiorly)
- Prevertebral fascia
- Vertebral muscles
- Cervical transverse process
- Sympathetic chain
- Pleura (Inferiorly)
- Vertebral artery
- Thoracic / Lymphatic duct
- Carotid artery (inferiorly)
- Four cranial nerves:
- Glossopharyngeal
- Vagus
- Accessory
- Hypoglossal
- Thyroid Lobe

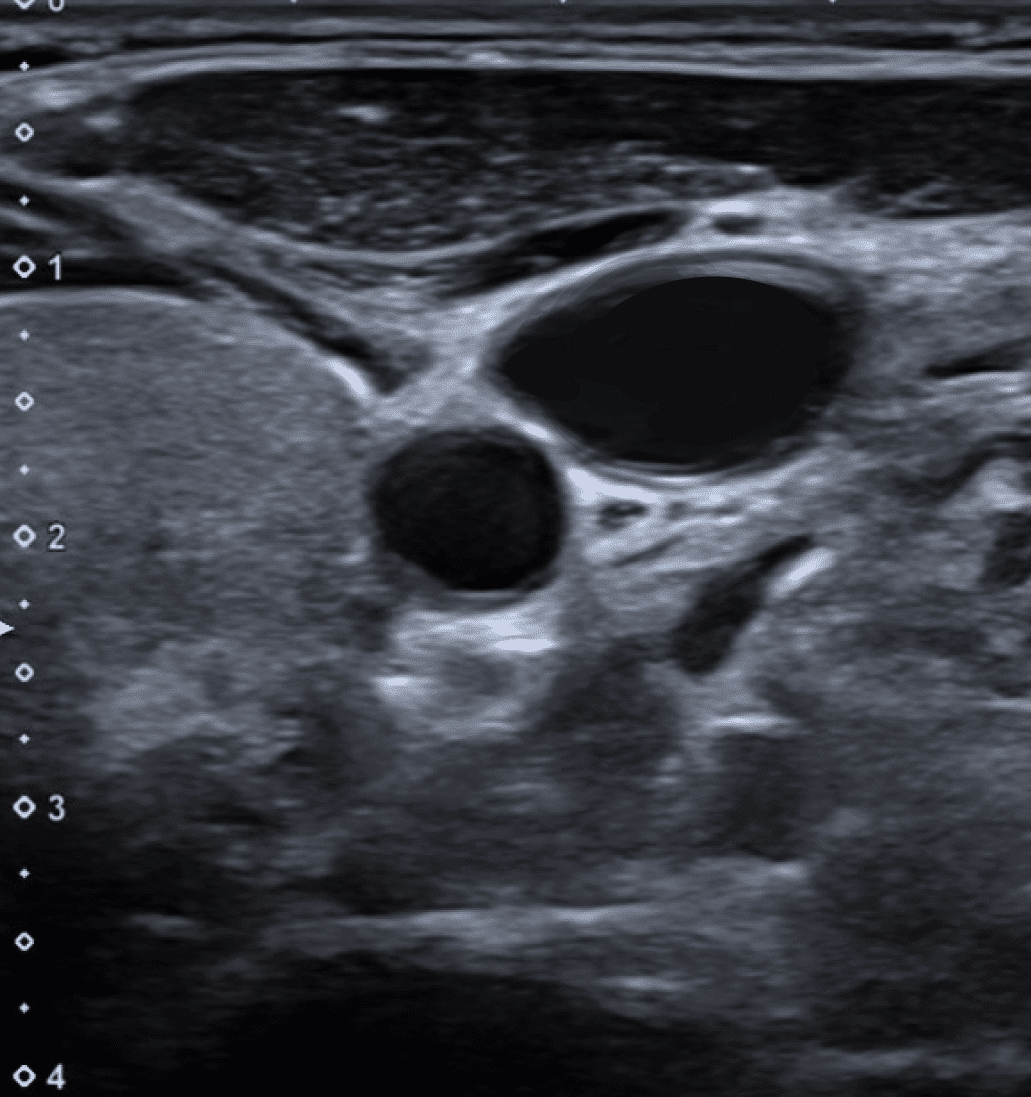
How does the anatomy of the IJV appear on ultrasound?
- IJV usually at a depth of 1-2 cm below the skin
- Closely associated with the internal carotid artery:
- At the level of the cricoid cartilage it is usually found lateral slightly overlying (optimal view)
- Sternocleidomastoid muscle can be seen overlying

Subclavian Vein
What is the course of the subclavian vein?
- The continuation of the axillary vein beginning at the lower border of the 1st rib
- Initially arches upwards across the rib
- Once over the rib angles medially and downwards to join with the internal jugular vein behind the sternoclavicular joint
- Lies beneath the clavicle for most of its course
- Following the merger with the internal jugular vein continuous as the brachiocephalic (innominate) vein continuing towards the mediastinum:
- Not symmetrical bilaterally
- Left side arcs gently through the innominate vein to the superior vena cava whilst the right side angles sharply
- Can cause difficulty inserting right sided catheters leading to kinking or passing into the left subclavian vein
Which structures are in close proximity to the subclavian vein?
- Lies beneath the clavicle for most of its course
- Most of the relevant structures lie posterior to the vein
- At the lateral section as it approaches and traverses the first rib structure posteriorly include:
- Anterior scalene muscle – around 1.5cm thick providing some protection against arterial puncture at this point
- Phrenic nerve –
- Subclavian artery
- Brachial plexus
- Apical pleura
- Medial to first rib:
- Phrenic nerve
- Internal mammary artery
- Pleura – the subclavian artery arcs superiorly leaving the vein apposed to pleura

Femoral Vein
What is the course of the femoral vein?
- Passes through the femoral triangle within the femoral sheath
- Medial to the femoral artery
- Distally the artery overlaps anteriorly to the vein
- Traverses the inguinal ligament at the midpoint
- Becomes the external iliac vein

Ultrasound-Guided Insertion Technique
How do you insert an internal jugular vein CVC?
- Sterile gloves and gown
- 2% chlorhexidine / isopropyl alcohol cleaning swabs
- Sterile drape with window
- Gauze swabs
- Local anaesthetic, syringe and needle
- Suture
- Sterile transparent dressing
- Normal saline
- CVC insertion kit:
- Needle /cannula and syringe
- Guidewire
- Scalpel
- Dilator
- Central catheter
- Capless valves for lumens
- Bedside ultrasound
- Ultrasound probe cover and gel
- ICS / FFICM or Local Safety Checklist
- Assess and correct coagulopathy
- If evidence of coagulopathy:
- Consider correction based upon the clinical situation
- Consider femoral insertion site
- Should be inserted by an experienced operator with ultrasound guidance
Consent
- Explain the risks of the procedure and complete a consent form
Monitoring
- AAGBI Monitoring
- ECG (to monitor for arrhythmias with guidewire) and pulse oximetry essential
Patient Positioning
Upper body lines:
- Flat with head-down tilt (Trendelenburg)
Femoral lines:
- Flat is usually optimal position
Cab be performed semi-sitting if issues with dyspnoea or raised ICP
-
Complete safety checklist
-
Ensure full sterile clothing worn
-
Clean the site with chlorhexidine / isopropyl alcohol and allow to air dry
-
Prepare tray and catheter for insertion:
-
Flush all lumens of the line with saline
-
Ensure caps or 3 way taps available for all lumens
-
Line up trolley with equipment in order they will be used
-
-
Identify the anatomy of the insertion site using US:
-
Ensure the vein is patent
-
-
Infiltrate a small volume of lidocaine into the skin and subcutaneous tissue
-
Use ultrasound guidance to guide the needle tip into the vein until flashback of blood is seen in the syringe.
-
Remove the syringe, stabilizing the needle in position
-
Gently insert the guidewire into the vein to approximately 10-20cm:
-
Ensure advances easily without resistance
-
Observe for any ectopic beats or arrhythmias – if noted, withdraw the wire
-
-
Using ultrasound confirm the presence of the wire within the vein
-
Whilst stabilizing the wire withdraw the needle
-
Perform a small nick to the skin with the straight blade of a scalpel
-
Advance the dilator over the wire. Using a gentle twisting motion insert the dilator to the depth of the vein to dilate the skin.
-
Maintaining control of the wire, remove the dilator and thread the catheter
-
Slowly feed the wire through until the end exits the distal (red) lumen of the catheter. Maintaining control from the end of the wire advance the catheter over to the desired length
-
Remove the wire and confirm with the second operator
-
Suture the line the skin at 4 points
-
Apply a sterile dressing ensuring the entry site is clearly visible
- Confirm position of line within the vein before use:
- CVP trace observed
- Ultrasound visualisation of line within vein
- Blood gas sample showing venous blood
- Position consistent with venous site on chest x-ray
- Review chest x-ray to confirm position of tip
- Document procedure including details of lines, operator and complications
Landmark Insertion Technique
What are the approaches for landmark insertion of an internal jugular CVC?
- Insertion point is apex of Sedillot's triangle
- Sternal head of sternocleidomastoid
- Clavicular head of sternocleidomastoid
- Superior border of medial 3rd of the clavicle
- Needle angled at a 45° to the skin
- Aiming toward the ipsilateral nipple
- Insertion point is the medial border of the sternocleidomastoid at the level of the cricoid cartilage.
- Needle angled at a 45° to the skin
- Aiming 15°–45° laterally
- To initiate the posterior approach, the needle is placed at the posterior border of the sternocleidomastoid muscle, at a point one-third of the way from the sternoclavicular joint to the mastoid process
- Needle angled at a 45 degrees to the skin
- Aiming toward the ipsilateral sternoclavicular joint

What are the approaches for landmark insertion of a subclavian vein CVC?
- Insertion point is 1-2cm inferior to the point of the middle and lateral thirds of the clavicle
- Needle passed under the clavicle aiming toward the junction of the middle and medial thirds
- Needle should be kept flat using finger and never angled posteriorly to avoid arterial or pleural puncture

What are the approaches for landmark insertion of a femoral vein CVC?
- Femoral artery usually palpated in the mid-point of the inguinal ligament
- Insertion point is 1-2cm inferior to the inguinal ligament and 1cm medial to the maximal pulse of the femoral artery

Management
What needs to be done routinely to manage a central line in situ?
- Assess the line daily:
- Determine the clinical need for keeping the catheter -remove promptly if no longer required
- Signs of infection: erythema, pain, tenderness, swelling or discharge
- Integrity of sutures & dressings
- Handle in aseptic manner:
- All blood sampling should be performed using full aseptic technique
- Clean ports with chlorhexidine / alcohol swab before accessing
- Flush unused lumens with saline 4-hourly
- Change of administration sets:
- Blood products: Immediately after use
- TPN / propofol (lipid containing): Every 24 hours
- Clear fluids: Every 96 hours
Removal
When should you remove a central line?
- When it is no longer required:
- Should be assessed daily to determine need
- Evidence of infection:
- Either local or systemic catheter related infection
- Should be assessed daily
- Blocked lumen
- Other complications
Should CVCs be changed routinely?
- There is no evidence to support the routine change of CVCs unless clinically indicated
- Does not reduce the rate of CRBSI
- May increase the rate of insertion-related complications
How should do you remove a central line safely?
- Use strict aseptic technique
- For upper body lines (IJV or SCV) position the patient so the head is down below the level of the heart (Trendelenburg) to prevent air embolism
- Remove dressing and cut sutures. Clean with chlorhexidine, allowing to air dry
- Steadily pull the catheter back applying pressure to the insertion site
- Apply an airtight dressing and maintain pressure until any bleeding stopped
- If suspicion of CLBSI send tip for M,C&S
- Inspect line for completeness and document procedure.
CRBSI Prevention
See Page: CRBSI Prevention
